How to Flashing / UnBrick Xiaomi Redmi Note 4 MTK (Mediatek) Nikel

After the previous article we share about the file firmware or ROM MIUI Xiaomi Redmi Note 4 from Flashtool, this time we will try to give a review.

About what the reviews are? of course after the file share our firmware will soon provide a discussion of easy steps flashing Xiaomi Redmi Note 4 via Sp Flashtool. Who is not interested in smartphone Xiaomi Redmi Note 4 with armed with amazing specs.

This smartphone bears Android OS v6.0 Marshmallow and adopts processor chipset from Mediatek MT6797 Helio X20. The power of the 2.1 GHz Deca core processor makes Redmi Note 4 has a very stable performance every run of the command launches various applications. Redmi Note 4 comes with two variants offer different RAM capacity between 2 GB and 3 GB.

In addition, the other offerings of internal memory include 16 GB and 64 GB. Connectivity it has been enough to satisfy every user needs. From the offer of 4G LTE internet connectivity also features Dual SIM which can be an option. The advantages of the rear-facing camera with a resolution of 13 MP camera and front camera 5 MP resolution. Offers spek owned by Xiaomi Redmi Note 4 is indeed complete and very reliable.

Back to reviews how flashing is like our goal to give tutorials to all of our buddies. This flashing tutorial includes our material on an empty occasion when no one has entered the service in the morning.

While we just found a customer who forgot the pattern on his Xiaomi Redmi Note 4 smartphone. Finally we can share through these reviews and hopefully be useful for my friend later. Now we will directly share the results of the flashing work to provide knowledge and step according to the procedure of flashing from us.

Before flashing, we also tried to reset but did not meet the expected solution. In our last decision is to do flashing so the problem can be quickly finished and become a note.

Well ... if my friend is the owner of the Xiaomi Redmi Note 4 smartphone or user and may face the same obstacles, maybe the way of repair and recovery is also the same as the steps we've will through.

Required :
  • PC or Laptop
  • USB cable
  • Vcom driver mediatek download HERE
  • SP flash tools download  HERE
  • Fastboot ROM download HERE, search for device type Xiaomi Redmi Note 4 and adjust the fastboot ROM version you want.
  • Xiaomi Redmi Note 4 batteries should be above 50%
  • Disable Driver Signature Enforcement, tutorial HERE
  • Mandatory Unlock Bootloader
Read also: How to install Xposed framework Xiaomi Redmi Note 4 MTK (MediaTek)

How to Flash Xiaomi Redmi Note 4 MTK

  1. Install Vcom driver and SP flash tools that have been downloaded earlier
  2. Fastboot Rome Extract already downloaded earlier
  3. Enter into SP flash tools with "run as adminstrator"
  4. Go to the "Download" tab in the SP tools application
  5. Make sure that in the "Download-Agent" menu of the bin file named "MTK_AllInOne.bin", you can find this file in the application folder of the Flash SP tool that you extract.
  6. On the scatter-loading file menu, locate this file "MT6797_Android_scatter", for the scatter file itself you can find on the extract of fastboot ROM you have downloaded.
  7. Now power off device then connect with your PC.
  8. Press the "Download" icon on the SP flash tools, then press "volume down" on your Xiaomi Redmi Note 4 or press "volume down" and "power" for your device to be read by SP flash tools.
  9. After your device is read with the sign of your device prossesor model seen in the SP flash tool, then you can stop pressing "volume down"
  10. Fastboot flash process will run and work if it looks conteng icon on SP flash tool application
  11. Done, all the process is finished just waiting for your device to boot it again.

ScreenShot for those of you who are confused
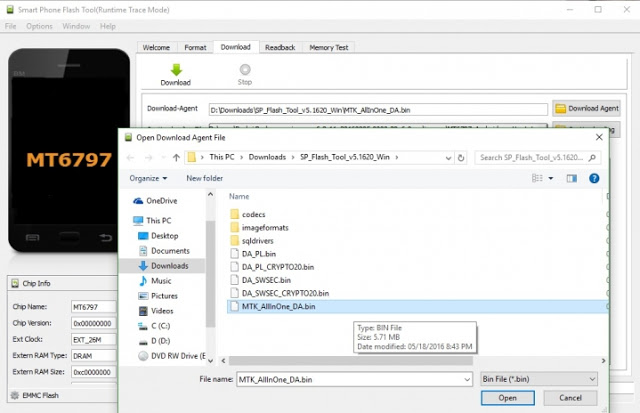


If the SP Flash tool you downloaded speak china when it is installed, follow the ways below to make the SP Flash tool application to speak english:

  1. Open the application folder SP Flash tool, then navigate to a file called option.ini open the file using notepad or similar applications.
  2. Find the writing or string [Language], on the value of CurrentLang = 1 change to CurrentLang = 0, save and then re-run the application SP Flash tool then the English language has become the main language of the application, for more easily see the screenshot below:


How to install Xposed framework Xiaomi Redmi Note 4 MTK (MediaTek)

kabardevices - How to install Xposed framework Xiaomi Redmi Note 4 MTK (MediaTek) , For those new to know what is Xposed would be wondering what is the use of Xposed? How to install it? Etc., a little I'll explain the purpose of installing Xposed.

For most smartphone users, they want their smartphones not to be bridled by the rules of the device. For example if you can see Folder System but can not edit it, that's a simple example that I know, Xposed also needs Root-access rights to run it, make sure your smartphone is in Root yes,
kabardevices - How to install Xposed framework Xiao Redmi Note 4 MTK (MediaTek), For those new to know what is Xposed will be wondering what is the use of Xposed, How to Install Xposed Framework Redmi Note 4, Install Xposed Redmi Note 4, How to Install Xposed Framework on Redmi Note 4, Redmi Note 4: How to Install Xposed Framework on Redmi Note 4 (Android Nougat), How to Install Xposed Framework Easy on Xiaomi Redmi Note 3 Pro, Install Xeby Framework in MIUI based on Android Nougat,
Xposed is divided into 2 categories: Xposed.apk And Xposed framework , in the 2 categories are important palette that is Xposed Fremwork. because you guys will not be able to run the application before installing Freamworknya first, And although your smartphone already has root privileges the results will remain the same before installing Freamwork first, 

You need to know to install Xposed Freamwork smartphone you must already have to install TWRP first, and that is not less important that must unlock bootloader + Must have done Root. well for you who want to install Xposed on Xiaomi redmi note 4 MTK just follow the way below,

INGREDIENTS
  • Xposed Installer | HERE
  • Xposed Freamwork | HERE
  • Xposed Freamwork Support MIUI9 | DISINI
Terms 
  • Must Already UBL Unlock Bootloader How | HERE
  • Must Already Installed TWRP How To | HERE
  • Must have ROOT How | HERE
  • Support Android 6 Marsmellow, Android 7 Nougat Not Try

Install Xposed Redmi Note 4 MTK

  1. Make sure the above 3 Terms you meet if you do not want to experience Failed Boot or bootloop, and do not forget to download the 2 materials that I have provided,
  2. Install Xposed Installer first on your device, after that Move Xposed Freamwork to the Root / Internal / External Directory make sure to put in a place that is easy to find,
  3. Turn off redmi note 4 you, then boot / boot / reboot back to TWRP Mode by Press and hold Power + Vol UP Button . Wait a few moments to release,
  4. On homescreen TWRP Press Wipe Select Advance Wipe -> Check (Davlik cache, Cache,) other than what I mentioned do not check, After that Scroll down arrow bada, Wait until finished.
  5. Back to Homescreen TWRP Press the Install button then navigate to Xposed Freamwork you have Download above, Click and drag the arrows at the bottom of TWRP, Wait until finished.
  6. When finished do not directly Reboot, select Wipe Cache Davlik on the bottom of TWRP, then Reboot.
  7. If the Boot process runs long do not worry it's side effects if Wipe, Cache, davlik, usually no later than about 15 minutes / 20 minutes just finished,
  8. When you enter Homescreen Selamat Redmi note 4 MTK You have successfully installed Xposed After this please edit / oprek mobile phone at will

Cara install Xposed framework Xiaomi Redmi Note 4 MTK (MediaTek)

kabardevices - Cara install Xposed framework Xiaomi Redmi Note 4 MTK (MediaTek), Bagi yang baru mengenal apa itu Xposed pasti akan bertanya-tanya apa sih gunanya Xposed? Gimana cara pemasangan nya? Dll, sedikit bakal saya jelaskan kegunaan memasang Xposed.

Bagi kebanyakan pengguna smartphone pasti ingin smartphone mereka tidak ter-kekang dengan peraturan-peraturan dari perangkat tersebut, Contoh jika kamu bisa melihat Folder System namun tidak bisa meng-editya, itulah contoh sederhana yang saya tau, Xposed juga membutuhkan hak-akses Root untuk bisa menjalankan nya, pastikan smartphone kamu sudah di Root ya,
kabardevices - Cara install Xposed framework Xiaomi Redmi Note 4 MTK (MediaTek), Bagi yang baru mengenal apa itu Xposed pasti akan bertanya-tanya apa sih gunanya Xposed, Cara Pasang Xposed Framework Redmi Note 4, Install Xposed Redmi Note 4, How to Install Xposed Framework on Redmi Note 4, Redmi Note 4 : How to Install Xposed Framework, How to Install Xposed Framework on Redmi Note 4 (Android Nougat), Cara Mudah Install Xposed Framework di Xiaomi Redmi Note 3 Pro, Install Xposed Framework in MIUI based on Android Nougat,
Xposed terbagi dalam 2 Kategori yaitu Xposed.apk Dan Xposed framework, dalam 2 kategori tersebut yang palin penting yaitu Xposed Fremwork. karna kalian tidak akan bisa menjalan kan aplikasi tersebut sebelum menginstall Freamworknya terlebih dahulu, Dan meskipun smartphone kamu sudah mempunyai hak akses root hasilnya akan tetap sama sebelum menginstall Freamwork terlebih dahulu, 

Perlu kalian ketahui untuk menginstall Xposed Freamwork smartphone kamu harus sudah wajib ter-install TWRP terlebih dahulu, dan yang ngak kalah penting yaitu Harus unlock bootloader + Harus sudah melakukan Root. baiklah buat kamu yang ingin meng-install Xposed pada Xiaomi redmi note 4 MTK langsung saja ikuti cara di bawah ini,
Baca Juga : Cara Upgrade MIUI 9 Redmi Note 4 MediaTek Tanpa PC Cuma 10 MENIT
BAHAN
  • Xposed Installer | DISINI
  • Xposed Freamwork | DISINI
  • Xposed Freamwork Support MIUI9 | DISINI
Syarat 
  • Harus Sudah UBL Unlock Bootloader Caranya | DISINI
  • Harus Sudah Terpasang TWRP Caranya | DISINI
  • Harus Sudah ROOT Caranya | DISINI
  • Support Android 6 Marsmellow, Android 7 Nougat Belum Coba

Install Xposed Redmi Note 4 MTK

  1. Pastikan 3 Syarat di atas sudah kamu penuhi jika tidak ingin mengalami Gagal Booting atau bootloop, dan jangan lupa download 2 bahan yang sudah saya sediakan,
  2. Install Xposed Installer terlebih dahulu pada perangkat kamu, setelah itu Pindahkan Xposed Freamwork ke Directory Root/Internal/Eksternal pastikan taruh di tempat yang mudah di temukan,
  3. Matikan redmi note 4 kamu, lalu booting/boot/reboot kembali ke Mode TWRP dengan cara Tekan dan tahan Tombol Power + Vol UP. Tunggu beberapa saat baru lepaskan,
  4. Pada homescreen TWRP Tekan Tombol Wipe Pilih Advance Wipe -> Centang (Davlik cache,Cache,) selain yang saya sebutkan jangan di centang, Setelah itu Geser panah bada bagian bawah, Tunggu sampai selesai.
  5. Kembali ke Homescreen TWRP Tekan tombol Install lalu arahkan ke Xposed Freamwork yang sudah kamu Download di atas, Klik lalu geser panah pada bagian bawah TWRP, Tunggu hingga selesai.
  6. Bila sudah selesai jangan langsung Reboot, pilih Wipe Cache Davlik pada bagian bawah TWRP, baru setelah itu Reboot.
  7. Jika proses Boot berjalan lama jangan kuatir itu efek samping jika Wipe,Cache,davlik, biasanya paling lambat sekitar 15 menit/20 menit baru selesai,
  8. Bila sudah masuk Homescreen Selamat Redmi note 4 MTK Kamu sudah berhasil terinstall Xposed Setelah ini silakan edit/oprek handphone sesuka hati

Cara Upgrade MIUI 9 Redmi Note 4 MediaTek Tanpa PC Cuma 10 MENIT

Install miui9 Redmi note 4 MTK (MediaTek) Tanpa PC, kemarin saya sudah buatkan tutorial cara install MIUI9 Dengan menggunakan metode Flash Via PC, nah sekarang saya bakal buat tutorial sebaliknya, namun Smartphone kamu harus sudah Terpasang TWRP (TownWich Recovery Project) gunanya memasang twrp untuk menginstall Recovery ROM.nya,
kenepa saya buat tutorial ini..? Karna tidak semua pengguna mempunya Laptop/Pc untuk melakukan Flashing, kalo menggunakan TWRP kan tidak usah Flash atau colok2 kan, langsung saja buat kamu yang G sabar ingin menikmati peforma dari MIUI9 langsung saja ikuti tutorial di bawah ini,

BAHAN
  • Download Developer MIUI9 DISINI
SYARAT
  • Redmi Note 4 kamu sudah harus Unlock Bootloader Caranya DISINI
  • Redmi Note 4 kamu harus sudah terinstall TWRP Caranya DISINI

Cara Install MIUI 9 Redmi note 4 MediaTek Tanpa PC

  1. pastikan Syarat yang sudah saya sebutkan di atas sudah kalian penuhi,
  2. Pertama Download Recovery MIUI9 yang sudah saya sediakan dan jangan lupa untuk menaruh File tersebut di Eksternal/Internal dan usahakan taruh di tempat yang mudah di temukan 
  3. matikan Smartphone kamu terlebih dahulu. lalu Booting kembali sambil tekan dan tahan Tombol Power + Volume Up, tunggu sampai Getar baru lepaskan. otomatis smartphone kamu akan booting ke mode TWRP,
  4. setelah masuk ke Mode TWRP klik Tombol Wipe -> Advanche Wipe -> Centang (Wipe Cache Davlik) Selain yang saya sebutkan jangna di centang jika tidak ingin Redmi note 4 kamu gagal booting, Geser panah pada bagian bawah Twrp untuk memulain proses, Tunggu sampai selesai
    Install miui9 Redmi note 4 MTK (MediaTek) Tanpa PC, kemarin saya sudah buatkan tutorial cara install MIUI9 Dengan menggunakan metode Flash Via PC, nah sekarang saya bakal buat tutorial sebaliknya, namun Smartphone kamu harus sudah Terpasang TWRP (TownWich Recovery Project) gunanya memasang twrp untuk menginstall Recovery ROM.nya,
  5. Kembali lagi ke Homescreen TWRP klik tombol Install lalu arahkan ke File Recovery Miui9 yang sudah kalian download di atas. Pilih baru Geser panah tunggu sampai selesai, biasanya sampai 15 menit tergantung keberuntungan,
    Install miui9 Redmi note 4 MTK (MediaTek) Tanpa PC, kemarin saya sudah buatkan tutorial cara install MIUI9 Dengan menggunakan metode Flash Via PC, nah sekarang saya bakal buat tutorial sebaliknya, namun Smartphone kamu harus sudah Terpasang TWRP (TownWich Recovery Project) gunanya memasang twrp untuk menginstall Recovery ROM.nya,
  6. bila sudah selesai jangan keluar dulu, pada bagian bawah ada Tombol (Wipe Chace&Davlik) pilih Geser panah, tunggu sampai selesai. baru setelah itu Reboot smartphone kamu.
  7. proses booting memang agak lama jadi kamu tidak usah kuatir gagal booting, 
  8. bila sudah masuk homscreen dan selamat smartphone kamu sudah berhasil Upgrade ke MIUI 9 tanpa ribet

Cara Update MIUI 9 Developer ROM Xiaomi Redmi Note 4 MTK (MediaTek)

kabardevices, kali ini saya bakal Update Tutorial cara Flash / Install / Upgrade Miui 9 untuk Redmi note 4X MTK (MediaTek) NOUGAT, sebenarnya redmi note 4 mtk sudah mendapat Update MIUI9 Via OTA (Updater) jadi kamu tidak usah susah-susah Update via Fastboot, namun banyak Juga para pengguna Redmi note 4 tersebut yang tidak mendapat update ke miui 9 via OTA,
cara flash miui 9 redmi note 4 mtk
penyebab utama jika smartphone kamu tidak mendapat update via OTA biasanya kalian salah menggunakan ROM atau lebih tepat kalian masih meng-install ROM distributor, atau beta, untuk itu saya sarankan menggunakan ROM Global agar Smartphone kalian tidak ketinggalan Update System Operasi,

untuk sekarang saya bakal buat tutorial cara Flash miui 9 via Sp Flash tool, Khusus Untuk pengguna Redmi note 4 mtk yang tidak mendapat update via OTA, bisa di bilang bahwa sistem operasi miui 9 yang baru di publikasikan agustus kemarin menjadi salah satu sistem operasi terbaik menurut saya,  tak hanya itu miui 9 juga sudah di padukan dengan OS Nougat, Baiklah untuk yang mau update langsung saja ke tutorial di bawah ini

BAHAN

Cara Install MIUI 9 Redmi Note 4 MTK

  1. Download semua bahan yang sudah saya sediakan, dan jangan lupa untuk mengeaktifkan USB Debugging pada Device kamu, Dengan cara Masuk Setting->Developer Options->Ceklis USB Debug, untuk yang belum tau cara aktifkan Developer Options ikuti cara berikut, Setting->About Phone-> Teb 7X Versi MIUI, sampai muncul pesan "selamat anda sudah menjadi pengembang"
  2. Ekstrak ROM Fastboot Redmi Note 4MTK & Ekstrak File Cust_Global yang kamu download di atas, Cari folder hasil Ekstrakan Cust_Global setelah itu pindahkan File Cust-Img ke dalam folder hasil Ekstrakan ROM Fastboot,
    Contoh : Ekstrakan ROM -> Images-> Taruh File Cust_Img Disini
  3. Install dan Jalankan Sp Flash Tool dengan Run as administrator,
  4. setelah itu tekan Tombol "Download Again" Kemudian Cari file dengan nama MTK_AllInOne_DA.bin pada folder SP Flash tool. Kemudian tekan OK.
  5. Pada bagian Scatter-loading > Klik > Kemudian carilah file MT6797_Android_scatter.txt pada folder Images ROM Fastboot,
  6. Kemudian pada bagian Preloader "jangan di centang/ceklis". Perhatikan Gambar di bawah in.
    cara install miui 9 redmi note 4 mtk
  7. Pada Sp Flash tool Tekan tombol Download pada bagian atas, 
  8. Matikan Smartphone kamu, "Setelah itu tekan dan tahan Vol Down/Turun", Sembari menyambungkan perangkat kamu ke PC menggunakan Cable USB,
  9. Pastikan Sp Flash Tool sudah menjalankan Tugasnya, Dengan di tandai Dibagian bawah ada Bar yang akan berwarna, Warna nya akan Berubah-rubah. Lepas Volume Down Ketika Bar loading berwarna Kuning.
    cara Upgrade Miui 9 redmi note 4 MTK, Nikel
  10. Tunggu sampai Proses Flash/Install selesai yang di tandai dengan muncul tanda Ceklis, Perhatikan Gambar di bawah
  11. Selamat Redmi note 4 MTK kamu sudah berhasil ter-install Miui 9.
Back To Top